I've Moved!

Thursday, February 28, 2013

banana caramel pudding with meringue topping.


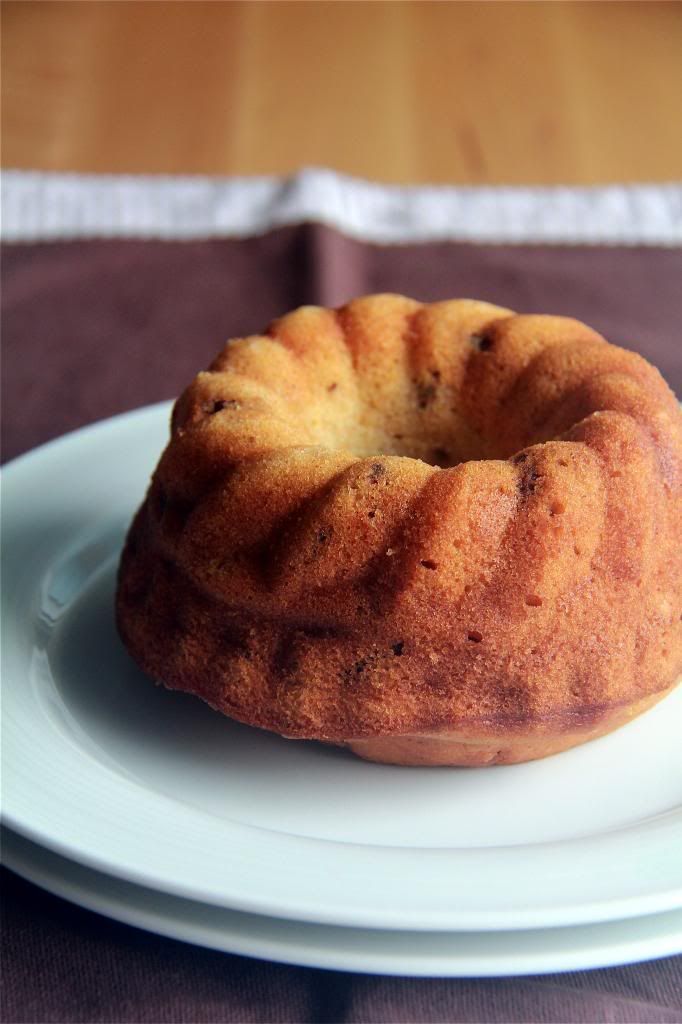
It feels like eons since I last posted! I miss writing so much. I miss photographing desserts so much. I miss baking so so much. It scares the poo out of me when I let my mind wander into the future and see how this is how my life would be for the about the next two years- baking only once a week and jumping at the every chance I can chill out with a cake, yet to be riddled with guilt during those precious stolen moments. I'm being a drama queen here- I'm sure the situation won't be that bad because thank heavens, there is this wonderful period of time called holidays. It's funny how much I look forward to holidays now because not one month ago, I was close to begging for the holidays to end because I was bored out of my wits. Well, not anymore.


Sometime yesterday, I found a rare pocket of time in my crazy schedule. To commemorate that spectacular find, I decided to bake. And bake I did this banana pudding. I must have lost touch with making caramel because when I was caramelizing the sugar and it reached the perfect shade of amber, I took it off the heat and looked on desperately as the color darkened further and further. It took me a while to figure out that I should probably throw in some cream to stop the cooking. Like, duh. So my caramel progressed to a deep deep mahogany shade, way darker than I ever intended for it to be. As a result, the overall pudding had a rich caramel flavour while I would prefer for it to be lighter so that it would be less overpowering and sweeter too.


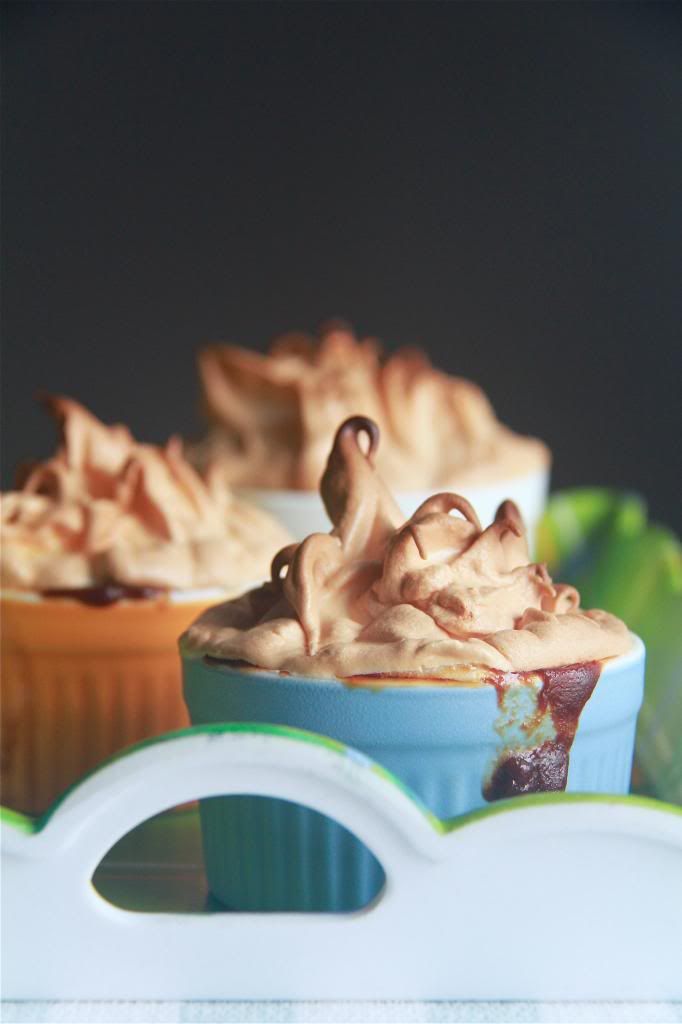
Maybe I should give you a rundown on the assembly of this dessert. Basically, you have pudding, banana, wafer, pudding, banana, wafer, pudding and then meringue. I did a round of pudding-banana-wafer less because my ramekins were reaching their height limit. The recipe said that you could experiment with other types of cookies apart from wafers so I tried using Ritz crackers for a salty contrast. I even spread a thin layer of peanut butter on one of the crackers just to see how well it would blend in. Of course it paired well with all the components in the dessert but it did make it taste really rich. Speaking of rich, I appreciated the meringue topping a lot more than just for its aesthetic appeal once I started eating because its lightness is a tremendously-welcomed change from all the heavy flavours.

You know what else would be really good with this pudding? Something coffee. And coconut.

Sigh. When will I get to post next I really have no idea. I miss this blog already.


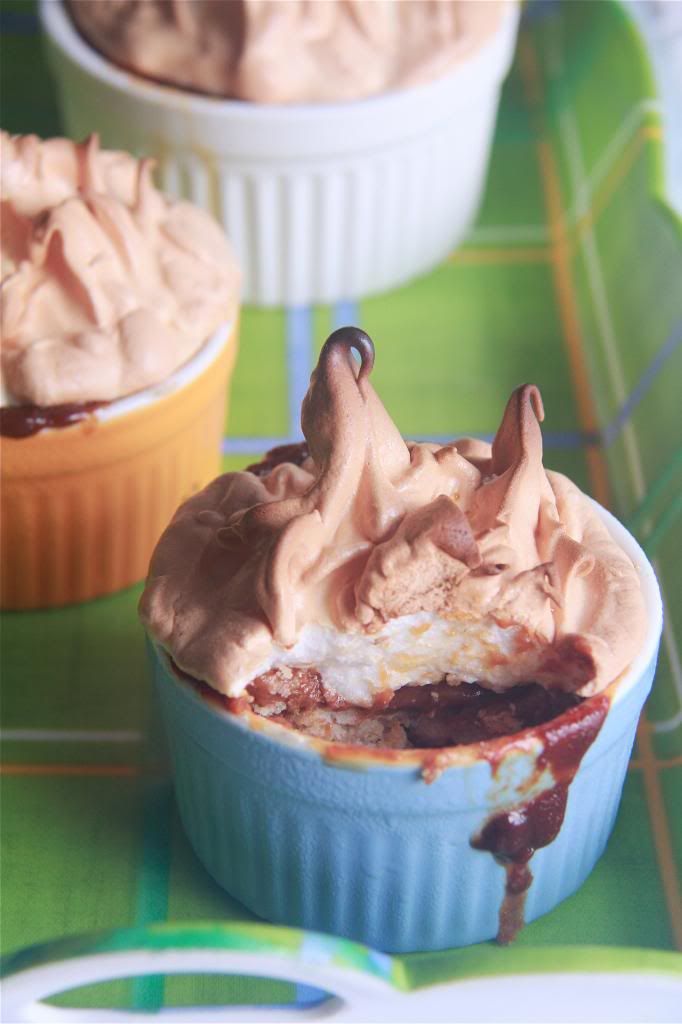
Banana Caramel Pudding with Meringue Topping
adapted from Baked Explorations
makes 8 servings

For the caramel base:
1 1/2 cups sugar
1/3 cup water
1 cup heavy cream

Combine the sugar and water in a saucepan and place on high heat, without stirring (but swirling the pan is okay), until the sugar has caramelized to a a rich caramel colour. Remove from heat and slowly pour in the cream. Stir until combined. Set aside.

For the banana pudding:
4 cups half-and-half, divided
1/3 cup cornstarch
pinch of salt
2 large eggs + 2 large egg yolks, beaten together
1/2 stick butter, cubed
1 tsp vanilla extract
5 to 6 bananas, not green yet not quite ripe, sliced
30 vanilla wafer cookies (about 6 ounces), crushed into large chunks, or the equivalent of any other cookies

Whisk 1 cup of half-and-half, cornstarch and salt together until the cornstarch has dissolved. Whisk the mixture into the caramel base and place on medium-high heat. Whisk in the remaining 3 cups of half-and-half. Bring mixture to a boil while whisking constantly until the mixture has thickened. Remove from heat and whisk vigorously for 15 seconds to release excess heat.

Stream in the eggs, whisking quickly until incorporated. Put the pan back on heat and bring to a boil for 1 to 2 minutes until the custard is really thick. Remove from heat and stir in the butter and vanilla extract. Strain the custard into a bowl and let it cool to room temperature before refrigerating for at least 1 hour or up to a day.

For assembly: Prepare a large 1 1/2 quart souffle dish or 8 6-ounce ramekins. Layer the components this way- pudding, banana, wafer. Aim for 3 sets if you can.

For the meringue topping:
4 large egg whites
1/4 tsp cream of tartar
1/2 cup sugar

Preheat oven to 350F.

Whisk the egg whites and cream of tartar until it soft peaks just begin to form. Add the sugar slowly while whisking constantly, until the egg whites reach stiff peaks.

Pile the meringue onto the pudding.

Bake for 12 to 15 minutes or until the meringue is golden brown. Cool for 30 to 40 minutes. You can serve it now or chill until completely cool it before eating.

Saturday, February 23, 2013

iced coffee chocolate cupcakes.


My life currently, can probably be likened to one of those bungee jumping thingamajigs. I'm strapped to the seat with nowhere to run. The machine starts and I'm flung into the air, seconds later I'm plunging downwards like my life doesn't matter. Before I know it, I'm sailing through the sky again. It's been a whirlwind of a week, with school starting and all. I'm not even close to the worst case scenario but I barely have time to breathe! Soon after I toss a task aside, it's not long before embark on yet another activity. The little pockets of time I have for blog-hopping are not just stolen, they are pilfered. Needless to say, I have hardly enough time to bake. But I will make time for it. Because above homework, my life is dictated by my love of sugar. And I will gladly submit to it.

For reasons unfathomable, my tastebuds have been clamoring for coffee. That made singling out a recipe so much easier from my endless to-bake list. Eventually, I settled on a recipe for an iced coffee chocolate layer cake and turned it into cupcakes instead.

The cupcakes turned out pretty well except for the cake portion, aesthetically and taste-wise. Okay, maybe the looks part was my fault because I kind of got over-zealous and over-filled the cupcake cases so the batter erupted and overflowed and looked like volcanoes for most. I had to pinch away the excess. And then I squirreled away the bits of cake to be savored at a later time. Baker's treat. Well I guess the appearance of the cupcakes then don't quite matter anyway since they were going to be filled and frosted. As for their flavour, I would have liked to detect a stronger coffee nuance because honestly, I couldn't tell if they were meant to be chocolaty or coffee-ish or even a mix of both. The two flavours cancelled each other out and resulted in a pretty bland cupcake.


Displeasures aside, I absolutely adore the coffee cream filling. It isn't power-packed with coffee punch but just a bit to complement the egginess and butteriness of the pastry cream. Tastes like buttery coffee toffee. Great balance of flavours. The chocolate frosting didn't do so bad itself either. Sure it was a little gritty because of the icing sugar but the chocolaty fudginess more than made up for it.

Overall, it's a pretty good recipe save for the cake part. By the way, I have two packets of solely teal/blue M&Ms and I'm stumped as to how to best show them off. Any decorating ideas?


Iced Coffee Chocolate Cupcakes
adapted from Baking by Flavour
makes 6

For the coffee cream filling:
1/3 cup light cream + 2 tsp heavy cream
1/6 tsp instant espresso powder
1 large egg yolk
1 tsp cornstarch
22g + 1 tsp sugar
pinch of salt
1/6 tsp vanilla extract
3g butter, softened

Bring the cream and instant espresso powder to a simmer in a small saucepan. Meanwhile, whisk the egg, cornstarch, sugar and salt until combined.

Slowly stream in the hot cream mixture into the egg yolk mixture, whisking constantly. Pour the mixture back into the saucepan and bring to a boil, still whisking constantly, until the mixture has thickened. Allow the mixture to bubble on a low boil for 1 minute before taking the pan off the heat. Stir in the vanilla extract and softened butter. Transfer pastry cream to a bowl and press a sheet of plastic wrap directly over the surface of the cream. Cool. Refrigerate the pastry cream for at least 6 hours before using. It can be made a day ahead and stored in the refrigerator.

For the cake:
7/12 cup (1/2 cup + 1 tbsp + 1 tsp) all-purpose flour
1/6 (2 tbsp + 2 tsp) cup cake flour
5/12 tsp baking powder
1/12 tsp baking soda
1/12 tsp salt
46g butter, softened
4/9 cup + 1 tbsp sugar
1 large egg
2/3 tsp vanilla extract
1 ounce unsweetened chocolate, melted and cooled
1/4 cup strong brewed coffee, cold
2 tsp milk

Preheat oven to 350F. Line a muffin tin with 6 cupcake liners.

Sift the flours, baking powder, baking soda and salt together into a bowl.

Cream the butter until smooth. Add the sugar in 2 additions, beating to incorporate after each addition. After the last addition, beat until pale and fluffy. Add the egg in 3 portions, blending until each portion is incorporated before adding the next. Stir in the vanilla extract and melted chocolate.

Alternately add the flour mixture in 3 additions and the cold coffee in 2 additions, beginning and ending with the flour mixture. Stir in the milk.

Divide the batter amongst the cupcake liners and bake for about 15 minutes or until a skewer inserted comes out mostly clean, with a few moist crumbs attached. Let the cupcakes cool completely before filling and frosting.

For the frosting:
33g butter, softened
1 2/3 ounces unsweetened chocolate, melted and cooled
large pinch of salt
1/2 tsp vanilla extract
1 4/9 cups + 2 tsp unsifted icing sugar, sifted
50ml milk

Beat the butter, chocolate, salt and vanilla extract together. Stir in half of the icing sugar until combined, then all of the milk. Blend in the remaining icing sugar until smooth then beat until lightened. Use frosting immediately or refrigerate for 10 to 15 minutes until it has thickened and firmed up slightly if it is too runny.

To assemble the cupcakes: Using a knife, core out the middle of a cupcake and fill with the coffee cream. Frost with chocolate frosting. Repeat for the remaining cupcakes.

Sunday, February 17, 2013

pecan, rum and brown sugar keeping cake.


I think I've waxed lyrical about desserts with rum like, only a million times. I have a weakness for them. Rum pound cake, rum buns, rum and milk chocolate waffles with creamy brown sugar and rum sauce oh. em. gee. That sauce! It should be your daily 8 cups of water a day.

Needless to say, this cake is already a winner in my books, based on the ingredients. I liked it, but it could have been better because I didn't have dark rum and dark brown sugar, only light ones. And to really gild the lily, throw in rum-soaked raisins. Now that's the stuff of heaven.

The best part is, the longer you keep it, the better it tastes. Of course, within a reasonable time frame. We're not trying to age cheese here!


Pecan, Rum and Brown Sugar Keeping Cake
adapted from Baking by Flavour
makes a 10 inch cake

For the cake:
3 cups all-purpose flour
3/4 tsp baking powder
1/4 tsp baking soda
1 tsp salt
1 tsp freshly grated nutmeg
1/2 tsp ground cinnamon
1/4 tsp ground allspice
1/4 tsp ground cloves
1 cup butter
2 cups firmly packed dark brown sugar
1/4 sugar
5 large eggs
2 tsp vanilla extract
1 cup sour cream
3 tbsp dark rum
1 cup finely chopped pecans

For the rum syrup:
1/4 sugar
1/4 cup + 2 tbsp water
1/2 cup dark rum
3/4 tsp vanilla extract

For the cake: Preheat oven to 325F. Prepare a 10 inch tube pan.

Sift the flour, baking powder, soda, salt and ground spices into a bowl.

Cream the butter and sugars until light and fluffy. Beat in the eggs one at a time until incorporated. Blend in the vanilla extract.

Stir in the flour mixture in 3 additions, alternating with the sour cream in 2 additions, until just blended. Stir in the rum, then the pecans. Scrape the batter into the prepared pan.

Bake for 75 to 80 minutes or until a skewer inserted into the cake comes out mostly clean. Cool the cake in the pan for 10 minutes before unmolding onto a rack.

For the syrup: Combine the sugar, water and rum in a small saucepan, cover and set over low heat until the sugar has dissolved. Remove the lid and increase the heat, heating until the syrup has reduced to about a 1/2 cup. Stir in the vanilla extract. Set aside to cool. The syrup can be made a few minutes before the cake is done.

Apply the syrup to the still-warm cake with a pastry brush. Cool completely before slicing.

Friday, February 15, 2013

peanut butter chocolate whirligigs.


Hey all you lovely people, happy belated Valentine's Day! I wish I had a recipe for something pink or heart-shaped to show you but no, I don't. Instead, I present to you these peanut butter chocolate whirligigs. Because taste ultimately triumphs appearances, it doesn't matter that these cookies are not in the least bit Valentine-ish. Then again, I am heavily biased towards peanut butter so take heart. Ha ha spot that? Yes? No? Um, sorry.

These cookies are really better devoured warm because then the chocolate swirl has a sort of crisp outside, like a crust, but the middle is still soft and melty. When the chocolate has cooled, the contrast in textures is also lost, hence why I say that attack the cookies warm!


As with cookie dough that has to be rolled up into a log and refrigerated, my dough became a semi circle of sorts. Geez. I should just make the cookies square. Oh and sprinkles were a last minute brainwave of mine. Everything looks better with sprinkles. Yeah.


Peanut Butter Chocolate Whirligigs
adapted from Baked Elements
makes 25 to 30 cookies (although I could easily end up with double that amount)

For the peanut butter dough:
2 1/4 cups all-purpose flour
3/4 tsp baking powder
1/2 tsp baking soda
1 tsp salt
3/4 cup unsalted butter, cool but not cold
3/4 cup smooth peanut butter
3 tbsp oil
1 cup firmly packed dark brown sugar
1/2 cup sugar
1 large egg + 1 large egg yolk
2 tsp vanilla extract

For the chocolate filling:
12 ounces dark chocolate, coarsely chopped
1/2 tsp light corn syrup

For the peanut butter dough: Whisk the flour, baking powder, baking soda and salt together.

In another bowl, cream the butter, peanut butter, oil and sugars together until fluffy. Add in the egg, egg yolk and vanilla extract and beat until incorporated. Stir in the flour mixture in 2 additions, stirring just to incorporate after each addition.

Pat the dough into a disk, wrap in clingwrap and refrigerate until firm, about 3 hours. The dough can also be made up to a day ahead.

After chilling, divide the dough into 2 portions. Roll each portion into a rectangle about 9 1/2 inches long by 7 1/2 inches wide and just under 1/2 inch thick. Refrigerate again while you make the chocolate filling.

For the chocolate filling: Melt the chocolate and corn syrup over a double boiler. Set aside to cool for a few minutes.

Retrieve a rectangle of dough from the fridge and spread half of the chocolate filling evenly all over the surface but a 1/2 inch strip on a long side. Roll up the dough, starting from the long end with chocolate. Wrap the cylinder of dough with clingwrap and refrigerate for at least 3 hours or until firm. Repeat for the other portion of dough.

Preheat oven to 350F. Prepare 2 baking sheets.

Slice 1/2 to 3/4 inch thick slices of dough and space them out evenly on the baking sheets. Bake for 11 to 13 minutes. Don't overbake.

Saturday, February 9, 2013

vanilla cream waffles.


Vanilla bean, vanilla extract and cream. In a waffle. It's pretty much a vanilla-lover's ultimate breakfast treat, no? A waffle that disables your ability to speak, to think. Well, at least in theory.

I hate to be such a killjoy but these waffles aren't as great as they sounded on paper. Texture wise, they were skimming the definition of nirvana. Spongey-cakey, not too dense yet not too light and perfectly treading the line between crisp and being too crisp. Really, I would give full marks for these waffles based on texture alone. Plus, they smelled heavenly while they were baking. What I was disappointed with was their flavour, or rather, the lack of it. They direly needed more sugar and the amount of vanilla that went in there wasn't justified.


Nevertheless, grab yourself a pat of salted butter and a shot-glass of maple syrup with these and all will be right with the world again.


Vanilla Cream Waffles
makes 2 round belgian-style waffles
adapted from Baking by Flavour

1/3 cup all-purpose flour
1/3 cup cake flour
7/12 tsp baking powder
1/6 tsp ground nutmeg
1/12 tsp salt
33g butter, melted and cooled
2 medium eggs, divided
1 tbsp + 1 tsp sugar (if not serving waffles with syrup, add more)
100ml heavy cream
1 tsp vanilla extract
1/6 vanilla bean, deseeded
pinch of cream of tartar

Sift the flours, baking powder, ground nutmeg and salt together into a bowl.

Whisk 1 whole egg and 1 egg yolk, sugar, melted butter, cream, vanilla extract and vanilla bean together in a bowl in this order.

Whisk the remaining egg white with the cream of tartar until it reaches stiff peaks.

Whisk the flour mixture into the egg mixture just until no streaks of flour remain. Fold in the egg whites until just combined.

Lightly oil and preheat waffle iron. Pour batter into the waffle iron and bake according to manufacturer's instructions.

Monday, February 4, 2013

tish's chocolate peanut butter cloud pie.


So. A couple of days ago, I logged in to my photobucket account, all ready to edit the pictures for this post and I got s.h.o.c.k.e.d. The photo editor has been replaced by a new version. I was upset. Yeah of course I was upset- despite being born in the era in which the Internet made its mega debut, I am strangely, sadly, a technology idiot. It takes me forever to get used to a certain computer function, and eons to adapt to a newer version of it. Plus, the focus tool thingy I relied on and loved so much is now gone! I lamented the loss of my beloved photo editor, but now I guess there's no choice but to get used to this new version.


Change. The only thing constant is change. Well, I hope my love for sweets never alters!


This is a pie. A chocolate and peanut butter pie. Well duh. Needless to say as well, the pie was delish and I especially loved the peanut butter mousse (I'm a sucker for almost anything that has peanut butter in it). It was rich, uber creamy and surprisingly dense despite the addition of whipped cream. The chocolate filling in comparison is denser and also sticky in a cooled-hot-fudge kind of way. I was supposed to top it off with a mound of whipped cream but as you can see, the peanut butter mousse was threatening to overflow already.


If I had one thing to nitpick at, it would be the crust. It seemed like a sturdy crust at first but after scraping the the chocolate and peanut butter fillings in and chilling it for only a few hours, the crust softened and bent a little whenever I picked it up. I didn't realize how relatively bad this sort of crust would take to moisture when I first read the recipe. It's because of the leavenings. The leavenings cause a whole lot more of tiny air pockets to dot the crust and these very pockets allow moisture to seep in, making the crust soggy. I'm so glad that I made the crust thick enough that it still retains enough structural integrity even for more than 24 hours after being filled. If you make this recipe, try to eat the pie as soon as after the components have set.


Tish's Chocolate Peanut Butter Cloud Pie
makes a 9 inch pie
adapted from Baking by Flavour

For the peanut butter cookie crust:
2/3 cup all-purpose flour
1/2 tsp baking powder
1/8 tsp baking soda
pinch of salt
1/4 cup unsalted butter
1/3 cup creamy peanut butter
1/4 cup sugar
1/4 cup firmly packed dark brown sugar
1 large egg yolk
1/2 tsp vanilla extract

Prepare a 9 inch pie pan.

Whisk the flour, baking powder, baking soda and salt together.

Cream the butter and peanut butter together until combined. Add the sugars and beat until combined and slightly pale and fluffy. Stir in the egg yolk and vanilla extract. Stir in the flour mixture until combined. At this point, you can either chill the dough until firm, roll it out into a 1/2 inch thick disk and press it into the pie pan or just take the dough as it is now and press it into the pan. Regardless of the method you choose, the pie crust then has to be chilled for 45 minutes after it has been fitted into the pan.

Preheat oven to 375F. Bake the crust for 13 to 15 minutes or until it is golden brown around the edges. Place the pan on a rack to cool completely.

For the chocolate-peanut butter mousse filling:
2 ounces bittersweet chocolate, chopped finely
1 3/4 cup milk
2 tbsp cornstarch
1/2 cup sugar
pinch of salt
2 large egg yolks
1/2 cup peanut butter
1/2 tsp vanilla extract
1 cup heavy cream, chilled

Place the chopped chocolate in a bowl.

Whisk the cornstarch, sugar, salt and egg yolks together in a bowl. Heat the milk in a saucepan on low heat until it starts to simmer. Slowly stream the hot milk into the egg yolk mixture, whisking constantly. Pour the combined mixtures back into the saucepan and bring to a boil, whisking constantly. When the mixture has thickened, remove from heat and stir in the peanut butter and vanilla extract.

Remove 1 cup of the mixture and stir it into the chopped chocolate until homogenous. Scrape the chocolate filling into the cooled pie crust and refrigerate until set, about 1 hour to 1 hour and 30 minutes.

Scrape the remaining peanut butter pastry cream into a bowl, cover with clingwrap with it touching the pastry cream's surface and refrigerate until cool but not set, about 45 minutes.

Whip the heavy cream until soft peaks hold and fold into the cooled peanut butter pastry cream. Spread it on top of the chocolate filling. Chill until set, 4 to 6 hours.

For the whipped cream topping:
1 cup heavy cream, chilled
1 tbsp sugar
1/2 tsp vanilla extract

Whip the cream until it just begins to mound. Add the sugar and vanilla extract and whip until softly firm peaks firm. Top the pie off with the whipped cream and chill for another hour.