I've Moved!

Saturday, October 25, 2014

pocky cake.

dessert - pocky cake

Today I came across a quote that spoke to me on many different levels:

"Don't ask yourself what the world needs; ask yourself what makes you com alive. And then go and do that. Because what the world needs is people who have come alive." - Howard Thurman

And then I found another quote:

"In quoting others, we cite ourselves." - Julio Cortázar

In the words of Bernie Kropp of The Incredibles, "Coincidence? I think not." (Or perhaps it could be - after all, I was looking at a compilation of at least 50 quotes.)


I told myself a few days ago that after the last cake I made, the oven mittens have to be put away, the spatula kept securely in its drawer. No I may not touch the butter, cookies are for eating and not for making tart crusts. Chocolate should be kept cold, not thrown into a warm bowl to be reduced to a delicious puddle.


Just 3 more weeks, a petrifying thought, yet in equal measure exciting. Just 3 more weeks and life will go back to normal. To the normalcy of 8 hour sleeps, indulging in fiction and not research papers, to step out of the front door into the embrace of fun activity without every step taken being leaden with bricks of guilt.

Just 3 more weeks. Time is ticking away. The countdown is starting to hit a desperate note. A pile of notes beckons yet here I am still typing. Forgive me for from this point I shall hurry.


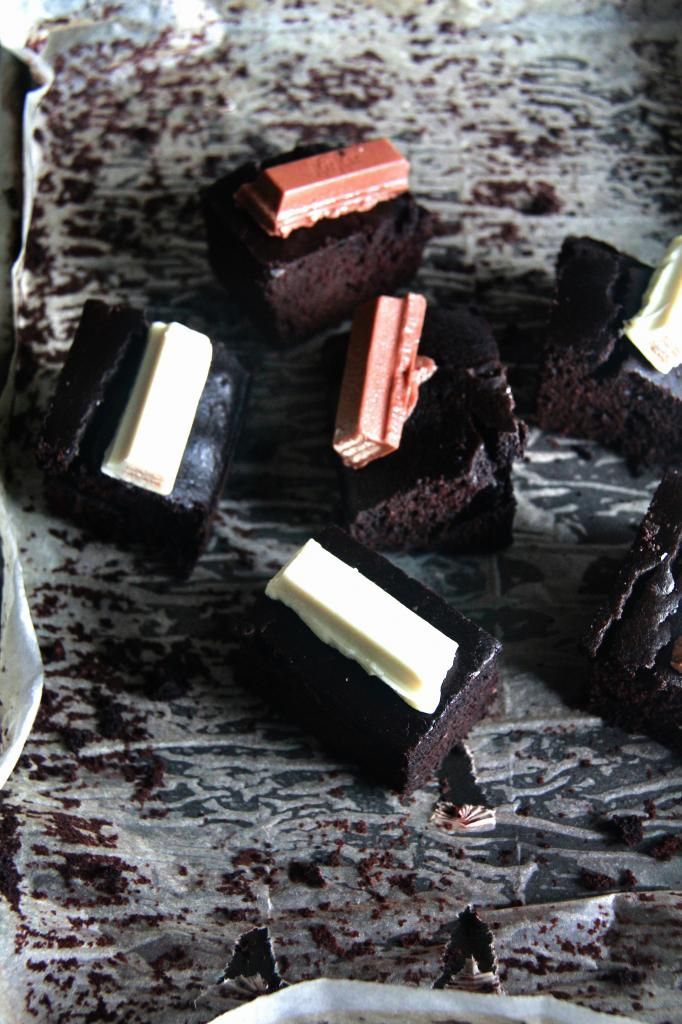
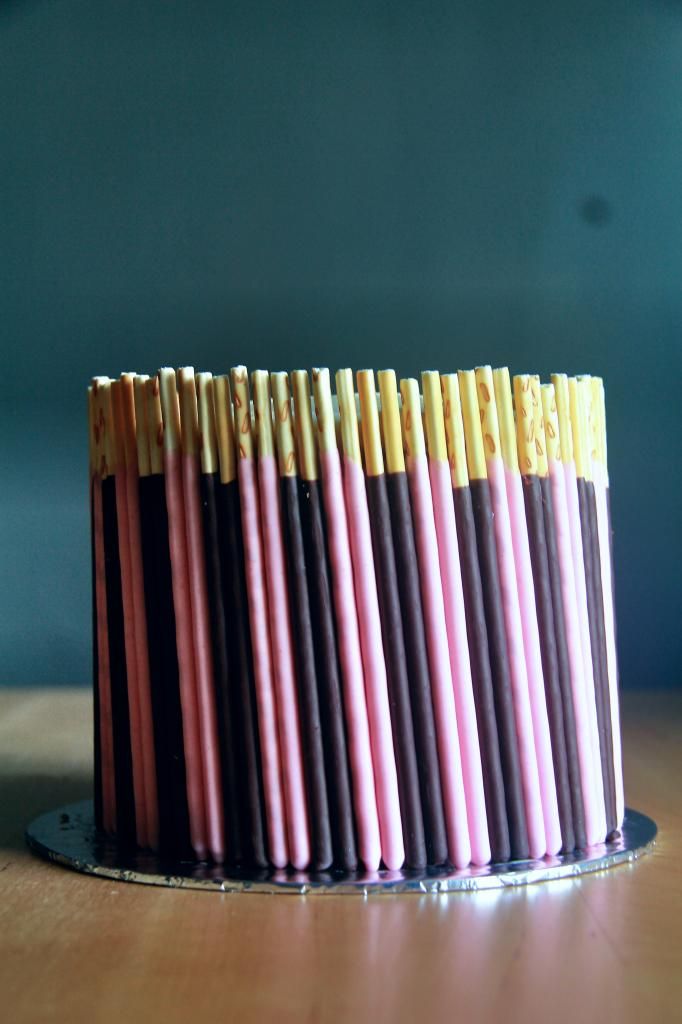
Decoration: Pocky sticks of strawberry and chocolate in their respective shades of bright pink and dark brown to be arranged side by side around the borders of a freshly frosted cake. Focus of the cake. Ribbon optional.

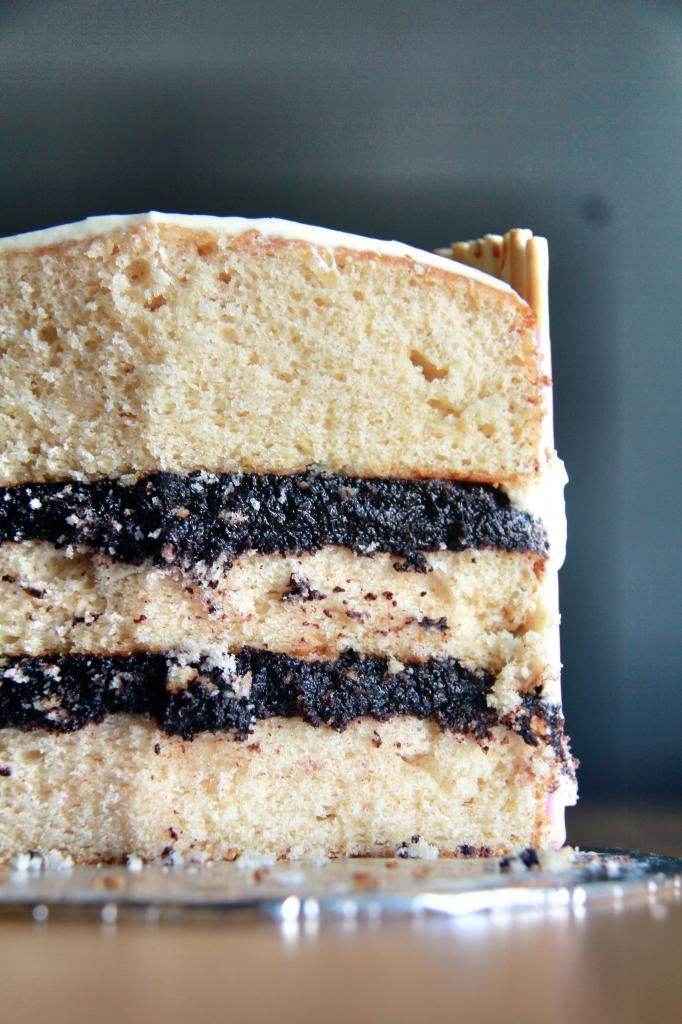
Cake: A mixed berries yoghurt cake. Fluffy, fruity, pocky-cake-worthy. This echoes the strawberry pocky.

Filling: Chocolate cake that has been reduced to crumbs, mixed with a generous amount condensed milk and a spoonful or two of milk. Tastes like fudge but with texture; a great way to use up leftover cake apart from making cake balls. I confess that I made cut-out chocolate cake hearts to be baked with the yoghurt cake batter but I totally forgot about their existence. Baking when I'm barely awake always results in a mishap or two - yet I never learn.


So here's the recipe, have fun!


Pocky Cake
makes a 5 inch cake

For the cake:
2 eggs
2/3 cup mixed berries yoghurt (feel free to use plain though)
1 1/2 tsp vanilla extract
2 cups sifted cake flour
1 cup sugar
1 tbsp baking powder
1/2 tsp salt
1/2 cup butter

For the filling:
leftover chocolate cake, crumbed
condensed milk
milk

For the frosting:
3/4 stick butter
3/4 cup icing sugar
pinch of salt

For decoration:
4 boxes of pocky

Bake the cake: Preheat oven to 350F. Prepare three 5 inch round cake pans.

Combine the eggs, 1/4 of the yoghurt and vanilla.

Place the dry ingredients in the bowl of your stand mixer and mix on low speed until combined. Add the butter and remaining buttermilk and continue to mix until everything is moistened. Increase to medium speed and beat for 1 1/2 minutes. Scrape down the sides of the bowl and gradually add the egg mixture in three batches, beating for 20 minutes after each addition. Scrape down the sides of the bowl once more.

Divide cake batter evenly amongst cake pans and bake for around 30 minutes or until an inserted skewer comes out clean. Cool cakes completely.

Make the filling: Mix the chocolate cake crumbs and enough condensed milk to form a paste. Add a splash of milk to loosen if too stiff.

Make the frosting: Beat the butter until smooth. Add the icing sugar and salt and beat until light and fluffy.

Assemble the cake: Trim the tops of the cakes if necessary to make them flat. Take the first layer of cake, spread half the filling on top, place the second layer on top of the filling, spread the remaining filling on top and finish with the last layer of cake.

Frost the outsides of the cake with the frosting. It will just be a thin layer but that's sufficient for getting the pocky to stick to the sides. Arrange the pocky sticks around the sides of the cake. Refrigerate cake until frosting has firmed up before serving.

Saturday, October 18, 2014

vegan chocolate kit kat cake.


Two days ago on the 16th of October, I finally graduated from junior college. (And then returned to school the next day for some mandatory briefing which was totally anti-climatic.) I have never known a more grueling time than these two years. All the late nights rushing out homework which resulted in precious breaks spent in a state of comatose, all the math quizzes and essays handed back with single digits scrawled in angry red ink, all the trudging up and down flights of stairs that seem strangely steeper on days I clocked in only a grand total of four hours of shut-eye; I'm so glad that I won't have to go through this experience again for at least a good few months but there remains the one final hurdle separating me and 12-hours-of-sleep-a-day paradise - an exam known affectionally and ironically as "As".


For the last official day of school, I baked this cake sorta as a parting gift for my friends and classmates because of the symbolic meaning of kit kats in Japan. Kit kats are pronounced as kitto katto in Japanese, which loosely translates to good luck. The vegan chocolate cake wasn't my original intention; I wanted to bake a sour cream cake instead but the fridge was out of eggs. My mum neglected to mention that she used up all of the remaining 8 for her cake after I'd madly rushed to the supermarket after my graduation ceremony with only 15 minutes to spare before closing time. Best mum award.

dessert - vegan chocolate kit kat cake

I was worried that the cake might not well-received but it turned out okay. The cake wasn't as chocolaty as the chocolate cakes I usually make but other than that slight drawback, it's pretty good for a vegan recipe. The amount of flour that goes into this is pretty shocking but if you take care not to overbake it the cake won't turn out anywhere near dry.

*Ending abruptly because my linguistic creativity is momentarily stumped*


Vegan Chocolate Kit Kat Cake
makes an 8 inch cake
adapted from the Flour Bakery cookbook

1 1/2 cups all-purpose flour
1/2 cup sugar
1/3 cup cocoa powder, sifted
1 tsp baking soda
1/4 tsp salt
2 tsp instant espresso powder
1 cup water
1/4 cup oil
1 tsp vanilla extract
2 tbsp molasses (I left out)

kit kats, for decorating

Preheat oven to 350F. Prepare an 8 inch round or square cake pan.

Whisk the flour, sugar, cocoa powder, baking soda, salt and espresso powder.

Whisk the water, oil, vanilla and molasses together in a separate bowl.

Pour the liquid mixture into the flour mixture and mix until the batter is smooth and homogenous. Pour batter into prepared pan and bake until an inserted skewer comes out mostly clean, about 20 minutes.

Cool in the pan until the cake is slightly warm, decorate with the kit kats and refrigerate. The heat from the cake will cause the chocolate to melt slightly so when you refrigerate the cake and the chocolate firms up again, the kit kats will stick to the cake.

Sunday, October 12, 2014

i'm in a book!


Hey guys! I have a very exciting piece of news for y'all today - I'm in Ramin Ganeshram's new book, FutureChefs!

Sometime late last year I was asked if I was interested to be featured in a compilation of talented young chefs (age 18 and under) and immensely flattered, I readily agreed.

p.s. there's a printing error in this page - my surname is "Koh" and not "Yi" due to Chinese naming practices

Yesterday, I received my copy of FutureChefs and it was pretty much like a dream come true seeing my name in print (on page 231!). But having my name in the same book with 149 other extremely extremely brilliant bakers and cooks is an even greater honor. Honestly, as I was reading their stories and accomplishments, I was wondering what I was even doing in that book; some kids have even been on TV, participating in cooking competitions and winning! In comparison to them, I just have this blog. But I love this blog, and 5 years worth of dedication has gone into it, and for that, I'm extremely elated and thankful that the effort is recognised ☺


I submitted the recipe for my lemon, white chocolate and strawberry cake to be published in the book (the same one that I submitted to Foodie Crush's summer magazine last year). I don't really remember how it tastes like now because it's been two years since I made it but it remains the most memorable recipe to me for the fact that it's one that I cobbled together instead of completely following a recipe, and which has soared to the number one spot on the popular post ranking on this blog (see sidebar on your right).

The pictures in that post aren't that great, the writing isn't that impressive. I would like to think that I've improved slightly in both aspects but I'm still light-years away from perfect. Being featured in FutureChefs has spurred me on even more to be a better baker in the future. Thank you all for your support thus far - I wouldn't be able to come so far without you guys!

Friday, October 10, 2014

snickers brownies.

dessert - snickers brownies

This week I'm trading petite cakes of creamy mousse and fluffy sponge for something I've not made in a long while - brownies. Unabashedly sinful, chocolaty brownies. And what better way to celebrate their comeback than to adorn them with snickers bars, peanut butter, salted caramel sauce and ganache?

If you thought that the "snickers" in snickers brownies solely referred to the addition of the candy bars, then I'm sorry, you're wrong. The peanut butter, salted caramel and ganache together were the essence of a quintessential snickers bar in their own right, and perhaps even better. So these are actually snickers times two brownies - in flavour plus in form.


I debated a bit between Alice Medrich's cocoa brownie recipe and Baked's, my two favorites. Alice Medrich's recipe yields extremely dense and fudge-like brownies while Baked's gives you brownies that are about equally chocolaty with a cakey/mousse-y texture. Since I was going to embellish the brownies with so many rich toppings, I figured that I should pick the former to avoid making the brownies too heavy overall.

These are such a great end to a stressful school week. Here's to the weekend!


Snickers Brownies
makes a 9 x 5 inch pan's worth

For the brownies:
1/4 cup + 1 tbsp flour
1/4 tsp salt
1/2 tbsp cocoa powder
1/4 cup butter
82g dark chocolate
1/4 tsp instant espresso powder
3/8 cup sugar
2 tbsp brown sugar
1 large egg
1/2 tsp vanilla extract

For the topping:
peanut butter
snickers bars, chopped
salted caramel sauce
ganache

Preheat oven to 350F. Line a 9 x 5 inch pan with parchment paper.

Whisk the flour, salt and cocoa powder together.

Combine the butter, chocolate and espresso powder into a heatproof bowl and heat over a pot of simmering water until the butter and chocolate have melted. Stir to combine and turn off the heat. Stir in the sugars until combined. Stir in the egg and vanilla, then the flour mixture.

Pour batter into the prepared pan and bake for about 16 minutes. Let the brownies cool in the pan for a while before dolloping spoonfuls of peanut butter onto the warm surface so that you can spread it evenly easily.

When the brownies have completely cooled, sprinkle the chopped snickers bars over the peanut butter and drizzle with the salted caramel sauce and ganache if you're using them. Chill the brownies for a few hours until they're cold through before slicing and consuming.

Saturday, October 4, 2014

rouleau café /ルーロー・キャフェ

dessert - roleau cafe (coffee swiss roll cakes)

Hey look! I think I've finally started to get a hang of this swiss roll biz! I've not had a cake that cracked on me upon rolling recently (i.e. this and this occasion). Perhaps now I can finally start exploring the world of deco rolls ~

If you've been following this blog for a while and have read my posts from the start to the end, you may notice that I frequently lament my tendency to slip up on at least one or two aspects of the recipe, from mixing the ingredients in the wrong order to adding the wrong quantity of flour. This time ... is no exception! (Should I even be happy about this?) Everything went well up until I had to make the filling which called for cream cheese which I thought I had but in fact, possessed none. I momentarily thought of swapping it for sour cream but that seemed a tad unsuitable so I settled for a cream-cheese-less whipped cream. It's such a pity, the slight tang and added richness the cream cheese would have lent the filling would compliment the bitter and sweet flavours of the coffee and caramel so splendidly. Oh and I accidentally let the caramel for the nut brittle go too far and ended up with a darker and more bitter nut brittle than I was supposed to have but a) no catastrophic damage done and b) what's new. I think it's because I always make caramel in small quantities and it cooks faster than I expect it to.


So I was really looking forward to make these because I've always thought that the idea of using slices of swiss rolls as a foundation for greater things is an ingenious one. You don't just have a cute petite base of a cake to pile your decorations on, you have a cake that envelopes fillings of countless possibilities and conceals them perfectly without having to frost the outsides with buttercream. It functions similarly to a tart shell but this has added height and a different texture for when you're bored of crunchy pastry. It is so flexible, the possibilities and variations limitless. I could spend hours conjuring up a whole slew of ideas using this cake base.


I actually had a pocky cake lined up for this week but I just couldn't wait any longer to try out this recipe (plus the fact that I was very reluctant to leave the house in search of pocky; dear god I'm turning into a hermit) and I'm really glad that I did. This cake is so. indescribably. delicious. But I'll try to describe it anyway. The sponge is really thin so it absorbs the moisture from the cream really well and oh em gee the cream(!). I knew that the drizzle of salted caramel was a good idea. I think the best part is the pieces of crunchy walnut brittle though because it breaks the monotony of moist and spongy. Oh and coffee and caramel is a match made in heaven so it's a no brainer that these would be awesome.

Definitely not going to share these.


Rouleau Café /ルーロー・キャフェ
makes 8

For the sponge:
2 egg whites
60g sugar
2 egg yolks
2 tsp instant espresso powder mixed with 10ml boiling water
20ml milk
20g butter
50g flour

Make the sponge: Preheat oven to 180C. Line a 10 inch square cake pan with parchment paper.

Combine the dissolved coffee, milk and butter in a heatproof bowl and heat over a pot of boiling water until butter has melted. Stir mixture and set aside to cool.

Whisk the egg whites and sugar until stiff peaks. Add in the egg yolks and whisk to combine.

Whisk in the flour until combined. Whisk in the coffee mixture until mixture is homogenous.

Pour the batter into the prepared pan and bake for 12 to 15 minutes or until an inserted skewer comes out clean.

Cool cake in the pan completely.

Make the walnut brittle:
30g walnuts, toasted and chopped
50g sugar
2 tsp water

Combine the sugar and water in a saucepan and heat until the mixture is a golden amber. Stir in the walnuts and pour the caramel onto a silicon mat. Cool completely.

Take about 15g of the cooled brittle, place it in a small plastic bag and smash it into small pieces using a rolling pin or just something hard.

Break the remaining brittle into 8 pieces.

Make the filling and topping:
200ml whipped cream
4 tsp sugar
2 tsp rum

Whip the cream, sugar and rum until the mixture reaches medium-stiff peaks.

Assemble the components so far: Remove the sponge from the parchment paper. Create shallow horizontal slits in the surface of the cake at the end where you will be rolling the cake from using a knife.

Spread half the whipped cream onto the cake. Sprinkle with the crushed brittle. Roll the cake up and refrigerate until the filling has firmed up. Refrigerate the remaining whipped cream.

Slice the roll into 8 portions. Transfer the remaining cream into a piping bag fitted with a large round tip. Pipe four small mounds of cream onto each cake roll that has been turned onto its side.

Make the coffee sauce:
1/2 tsp instant espresso powder
1/3 tsp rum
1 tsp nappage glaze

Combine all the ingredients. Transfer mixture to a small paper coronet and drizzle over the cakes. Top with a shard of nut brittle.